上QQ阅读APP看书,第一时间看更新
Time for action — downloading and deploying Roller
In this exercise, we'll go to the Roller download website, grab the latest Roller zip file and copy it to Tomcat's webapps folder.
- Go to the Apache Roller downloads web page (http://roller.apache.org/downloads.html) and click on the Roller 4.0.1 ("best available") link from the General Availability (GA) Releases section:

- Scroll down to the Roller 4.0.1 section of the next page, and click on the
apache-roller-4.0.1.ziplink:
- Select the Save File radio button from the Opening apache-roller-4.0.1.zip dialog and click on OK to start the download process. The file will take several seconds to download (or minutes, depending on your Internet connection speed).
- Go to the directory where you downloaded the
apache-roller-4.0.1.zipfile. - Unzip the file and double-click on the
apache-roller-4.0.1folder that you've just unzipped. Then double-click on thewebappfolder, right-click on therollerfolder and select Copy from the pop-up menu:
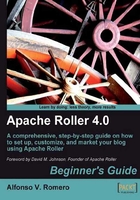
- Use Windows Explorer to navigate to the Tomcat
webappsfolder (C:\Program Files\Apache Software Foundation\Tomcat 6.0\webapps), right-click on a blank area in the Windows Explorer right panel and select Paste from the pop-up menu:
- Wait until the copying process finishes. There should now be a
rollerfolder inside Tomcat'swebappsfolder, as shown in the following screenshot:
- Now you can close Windows Explorer.
What just happened?
In this last exercise, you downloaded and copied the Apache Roller folder to Tomcat's webapps folder. Now that you have all the Roller files and folders inside Tomcat, you need to create a database where Roller can save all the information related to your blog.